Tuesday, 30 May 2017

Clean, Paint, Repeat

This week has consisted mostly of cleaning 40 years of built up grease and mud from the rear axle components. It's slow, tedious and makes an absolute mess of my garage , but I've now got all components of both axles cleaned and painted, except the diffs.


I picked up a replacement diff to replace the knackered rear diff. It's a late series 3 diff, and seems to be in good condition with minimal play. These diffs have a flat bottom, and don't have the bolt on pinion oil seal carrier like the earlier diffs. They came about in 1971 when the Range Rover was released, as the same casting is shared across all models. So late Series 2A's, and all 3's (SWB) should have this type of diff. I'm now chasing a second diff like this, so that I have a matching pair front and back. I've cleaned up my front diff and it appears to be a very early series 1 diff, stamped 1953! So I definitely want something more 'era correct'


Newly acquired series 3 diff on the left. Old front diff on the right, possibly a Series 1 type. 

While having a look at the gearbox, I went in search of the serial number. Turns out its a Series 2A gearbox. Seems this Land Rover has had a fair bit of parts swapped over it's life. So now I'm on the lookout for a series 3 gearbox, to keep it all correct. The 2A box would be fine, but they don't have a synchromesh on 1st and 2nd gear, so there is a noticeable difference.
Gearbox serial number

I hope to have the chassis sandblasted next week, then it's going to be a nice change from cleaning and painting, to grinding and welding.

Stay tuned.

Tuesday, 23 May 2017

I've been busy!

I've been neglecting the blog in the last week, I've made a lot of progress but haven't done any updates. Rather than spill too many words Ill let the pictures do the talking.

Basically I've :


  • Stripped the rear diff. Found that the front pinion bearing had suffered a catastrophic failure, hence the seized diff. The rollers had friction welded to the raceway. This caused the bearing to spin on the shaft until it also friction welded to the spacer next to the bearing. basically it's f**ked and I will source a replacement diff head. I hope to find the 'proper' Series 3 type with the flat bottom casting and press in oil seal on the pinion shaft. This diff is the older style with the aluminium bolt on seal retainer.


  • Welded the donor panels into my good bulkhead, and scrapped the rusty old one. (no pics of this sorry)
  • Stripped the front axle, boxed up the disc brake setup as it's going back to Brian, who I bought the Land Rover from, I'm swapping him the disc brakes for some parts I need. I cleaned up the remaining parts with the wire brush wheel, applied CRC rust convertor, then painted in semi gloss black. I have borrowed this technique from Geoff @ http://www.geoffslandroverblog.com/ It's cheap and seems to work well. 


  • I repaired the rusty front radiator panel, it had the common rust/swelling in the lower piece of channel. I cut it out and welded in a piece of 30mm angle. 


I'm really just trying to do as much 'free' stuff as possible while I'm saving to have the chassis sandblasted. I hope to get that done in the next few weeks.


Sunday, 14 May 2017

Chassis Stripped Bare, Rear Axle Dismantled, Bulkhead Continues...

Last few days have been spent on a mixture of things. Firstly I removed the rear axle, Leaving the chassis bare. I was able to get 5 of the 6 shackle pins out, with the angle grinder being needed to get the last.

Both axles removed from chassis
Once that was out of the way I went back to do some work on the bulkhead. I wanted to get this done so I could throw out the rusty bulkhead and get some space back in the garage. I drilled out all the spot welds holding the centre panel and sides of footwells. This way I was able to cleanly remove it all as one piece.

Stiffener plate removed
Centre panel removed

It fits perfectly into the 'new' bulkhead, I've left it sitting there loose as I need to wire brush and prime the surfaces that will be overlapped. I hope to get it welded in next week, I will take it to work so I can use the MIG welder. 


Next job was to remove the spring bushes from the chassis, which isn't as straight forward as you'd expect it to be. They rust/seize into the bore, meaning you can't drift or press them out (though I did try) I ended up first removing the inner tube and rubber; some I was able to smash out, the others were set on fire, to burn the rubber. I then used a hacksaw to split the outer tube of the bush, releasing their grip. Then used a BFH to drift them out. I didn't taken any photos of this process, slack. 

I then took the chassis outside and gave it a good water blast/degrease. I want to get it as clean as possible before it is sent off for sand blasting. I rigged up a sack barrow with a ratchet strap to move the chassis, allowing me to lift one end of the chassis and walk it like a giant wheelbarrow. Once outside I hit it with the water blaster, doing both sides. It has come up pretty good, it's amazing how much of the original paint was still intact under the layers of dirt/grease.


With the chassis clean and back in the shed I started to strip the rear axle. When I bought the Land Rover I was told the rear diff was seized (half shafts & drive flanges had been removed to allow it to roll) so I was interested to get in and have a look at the diff. Everything was coated in oil so it all came apart easily. I was expecting to find the axle casing full of metal particles or bits of gear teeth (hence the seized diff) but it all seemed very clean. With the diff on the bench it seems OK visually, all teeth are OK, no major wear to the teeth. There is slight play in the ring gear so I assume that isn't seized, the spider gears spin freely but the pinion shaft is locked solid. I will strip the diff down this week and find out what is going on with it, hopefully it's a straight forward fix. 


Tuesday, 9 May 2017

Front axle & steering relay removed

There has been a bit going on in the few days since my last post. I picked up a tidy set of front guards (wings) off trademe, as the ones that came on the vehicle are beyond repair. I didn't want to buy parts for that far into the project yet, but they were cheap so I snapped them up.

Back in the garage I had been chipping away at the small bits & pieces still attached to the chassis, such as the handbrake lever assembly, wiring for the rear lights and brake lines. The brake lines were time consuming as the little self tapping screws used to hold the brake pipe clips to the chassis where all seized to some extent.

Small bits still attached to the chassis


With all these removed I turned attention to the front axle, my plan was to just unbolt the springs and shocks, and remove the whole lot in one big lump. I started with good intentions but once I discovered the shackle bolts where seized into the spring bushes, the angle grinder came into play. The 'rear' bolts of the front springs are threaded into the shackle plates but I couldn't even get the to turn, so I cut the shackle plates in half. I plan on replacing them anyway so no drama. Front bolts where the same; locked solid in the spring. So with a thin cut of wheel I cut between both sides of the spring and the chassis dumb-iron. Job done, axle on the floor. Luckily I still have Ellesmere Auto Electrical's engine hoist from the weekend, I don't know how I would have heaved the axle around without it.

Front axle liberated from the chassis


Next job was removing the steering relay from the chassis. I'd been dreading this, as from what I'd read on forums and restoration blogs it should have been a nightmare. I'd read about people using all sorts of pullers, hydraulic jacks and even chopping up the chassis to get it out. But in my case, it went exactly how the manual said it should. Removed the bolts and it drifted out with a few blows of a lump hammer. Relieved!

The steering relay is pressed into a tube within the chassis. 

And it's out. 
Rear axle removal is the next job, followed by removing the shackle bushes from the chassis.

Saturday, 6 May 2017

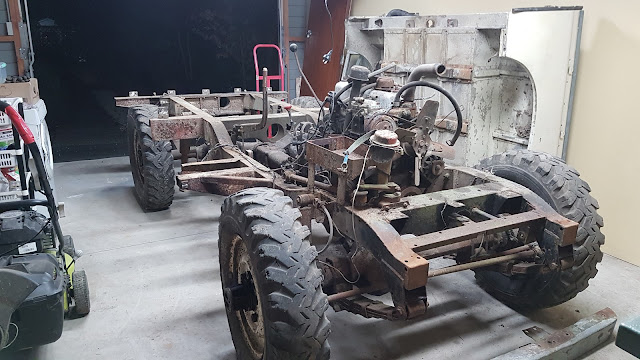
Tub removed, engine & gearbox out

It's been a busy few days in the garage. I've come down with a cold though which has slightly slowed progress. Firstly I got the tub off by lifting it slightly to slide a length of timber underneath then sliding it backwards until I could tip it off onto the back face. Pretty much the same way I removed the hardtop. Haven't decided how I will store it long term. At the moment it is in the garage, I'll move it outside if it starts getting in the way.


Next I started to strip the bulkhead, so that it's ready to be chopped up to transfer the centre panel to the 'good' bulkhead. Most of the trim and dash parts where pretty rough, and have gone in the bin. Luckily I have a good set of dash & trim from the donor bulkhead. I was able to remove the wiring loom in one piece without cutting anything, I'll have it checked out, hopefully I can reuse it! Some additional wiring had been added for the LPG system (which I've discarded) and for the brake pressure differential warning actuator (PDWA) , or brake failure switch as it's more commonly known.  This must have been retro-fitted at some stage, because as far as I'm aware, dual circuit brakes weren't introduced on Series 3 until 1980. The PDWA has a brake test switch on the dashboard. This is an instant test system check, If it lights up with the ignition switched on, the system should be functioning correctly because the shuttle valve is centralized in the valve body. 


 Wiring loom disconnected from the gauge cluster
Dash removed. 

Today's mission was to get the engine & gearbox out. This was pretty straight forward as pretty much everything was already disconnected/removed. At some stage someone had put silicon between the flywheel housing and bell housing so it took a pit of prying to break the seal, but once I made a gap right around, the engine withdrew nicely. 


 On the way out.
Engine out.

Gearbox was next, was made even easier by the fact that one of the rubber gearbox mounts was completely split in half, so I only had to undo one side.

Gearbox out.

So a productive day on the Land-Rover, I must say a big thank you to Ellesmere Auto Electrical for the lend of their engine hoist. This saved me the expense of having to hire one and made life a lot easier. Check them out at https://www.facebook.com/Ellesmere-Auto-Electrical-Air-Conditioning-1527320427548121/ and keep them in mind for any automotive work you need!

Wednesday, 3 May 2017

And it's off..

Short & sweet today, I spent a few hours in the garage after work and managed to remove both the bulkhead and the fuel tank. The latter was 3/4 full of rusty water, I guess 20 odd years outside with no fuel cap will do that.. It is full of pin holes so I've decided to throw it out, and will find either a good 2nd hand or new tank when the time comes to reassemble.

Bulkhead was pretty straight forward, though I had to cut the bolts that go through the chassis outriggers, as the nuts were rusted solid.

Tomorrow I'll tackle the rear tub and then the engine & gearbox over the weekend. I need to make a little skid with wheels on it, so I can drop the engine on it and still move it around until I'm ready to scrap it. Could be a project for Friday.

Anyway, here are the pics from today.


Tuesday, 2 May 2017

Preparing to remove bulkhead

I've spent the last two afternoons removing bits, preparing removal of the bulkhead. In no particular order this has included:

  • Floor panels & gearbox tunnel
  • Seatbox
  • Front panel & radiator
  • Brake master cylinder 
  • Clutch master cylinder
  • Disconnected wiring loom from everything in front of the bulkhead
  • Disconnected speedo drive cable from gearbox
  • Steering arm
  • LPG system (now in the bin)
  • Windscreen
Everything has been going pretty smoothly so far, mainly as I've been cutting off the bolts where possible, rather than persevering trying to undo rusted nuts. Anywhere the grinder can't get; I've hit with the air impact driver, which has had my tiny air compressor working overtime. 

 Floor removed. Haven't found any rust in the chassis yet apart from the bulkhead outriggers, which I already knew about. Gear lever is seized, will sort that out when gearbox is stripped.
 Wiring loom disconnected. It hasn't been hacked up like I thought it would have been. Some additional wiring has been added for the LPG system, but luckily it hasn't interfered with the factory wiring.
 Less Land Rover, more crap on the floor
Back half of the garage filling up quickly

Next job is to remove the bulkhead, still debating how to go about it. Two people can comfortably lift it, but I don't know if I have the patience to wait until the weekend to get someone to help lift it. I'm considering lifting it from the garage roof beam (should be OK, wouldn't think it weighs any more than 80 - 100kg) and then rolling the land rover back. 

I've started compiling a spreadsheet of all the parts i'm going to need to buy. I've found a few sites online which have pretty good prices and a good search system that allows you to search using to original LR part numbers, which i get from the genuine parts manual i found online. I printed it and had it bound, along with the LR repair & operation manual.

Parts manual, all 750 pages worth...

Links to these manuals can be found here: http://smithies.co.nz/land_rover/

Long overdue update

It's been over a year since I posted here so I thought i should bring the blog up to date, incase anyone out there actually reads it! ...