I haven't posted for a few weeks, but I've been flat out on the Land Rover, just haven't found time to do an update.
Things I've done since my last post:
Fitted new rear cross member. This was a pain in the backside to say the least. Before cutting off the old x-member I made a jig, that sat flat across the top surface of the x-member and picked up on the holes that secure the body. Fast forward a month or so and I'm bolting the new x-member to the jig and the distance from the top surface of the x-member to the holes is different to the old x-member, and therefore the jig. I guess you can't expect much better from Britpart. so after much deliberation I decided to use the jig to determine the distance, height and squareness of the x-member, but didn't pick up the holes. I will elongate the holes in the tub to suit, when the time comes to refit. I did throw the tub on to check alignment, and the holes are within 'half a hole' so it should work.
I then gave the whole chassis another coat of paint. I still need to spray some kind of rust inhibitor inside. I'm considering spraying chain bar oil inside to keep the rust away.
In the background I've also been chipping away at finishing my axles. My rear axle was pretty much done, Just needed to set the bearing end float. Using a DTI, I set them to 0.06 to 0.10 mm end float. Finished the assembly with new drive flanges, felt seals, split pins and end caps. I've fitted the brake backing plates but will fit new brake components later on.
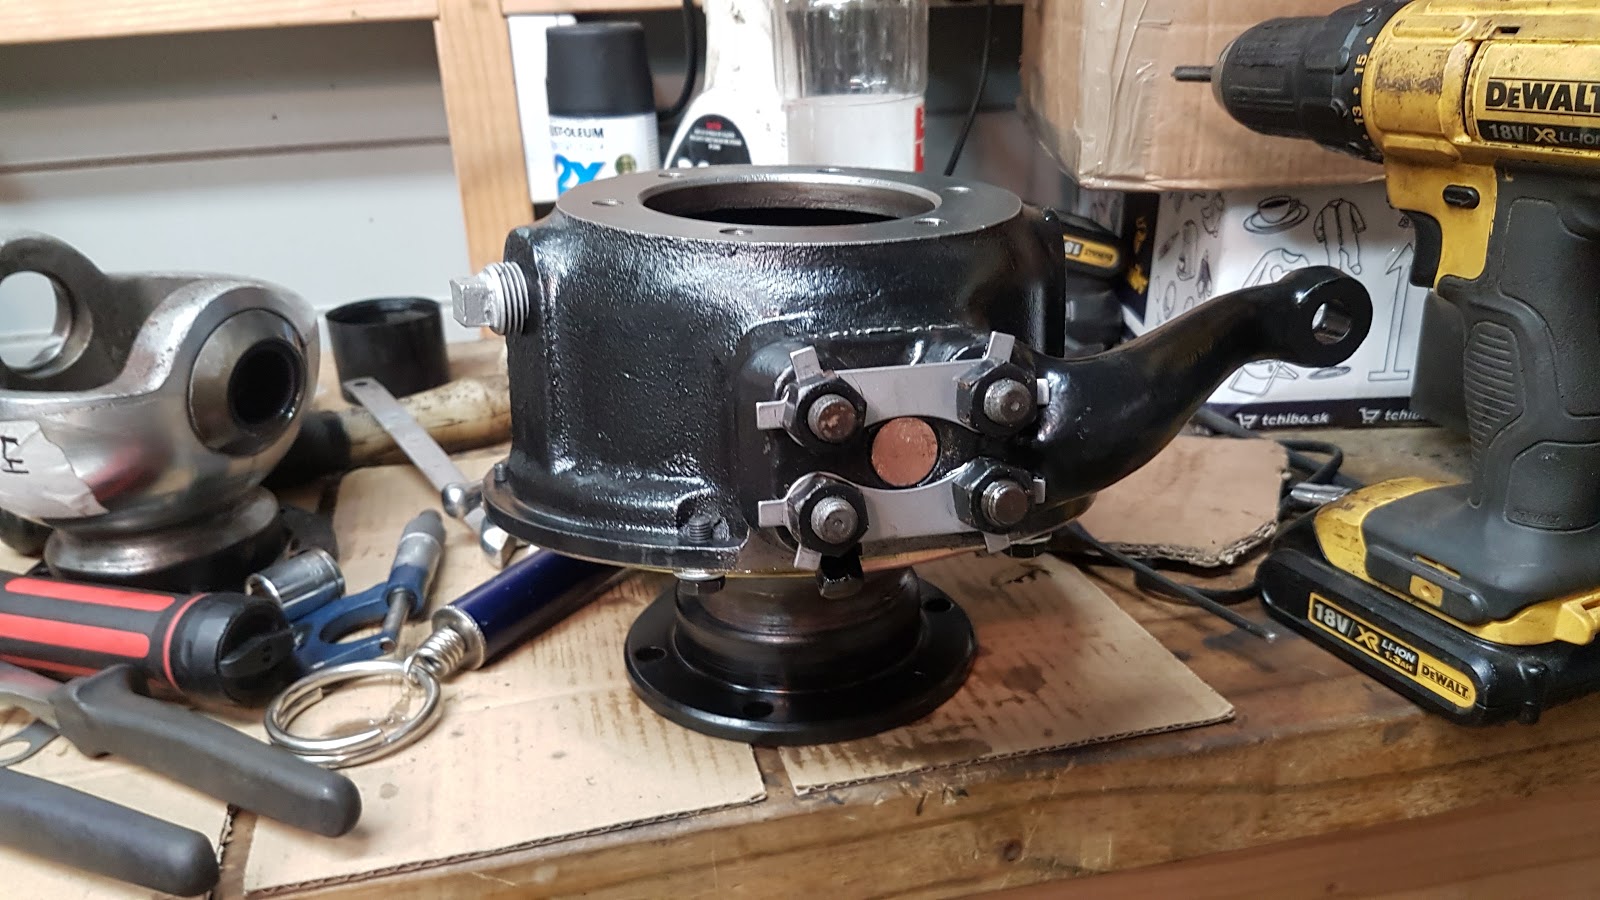
Front axle was a pretty big job. I overhauled the swivel hubs with new bearings, railko bushing and seals. My swivel balls have been re-chromed at some stage, so I am re using them. I bought a kit that came with The railko bushes and upper pins, the taper roller bearing and all the shims. It was an axle set so enough for both sides, and was reasonable quality despite being Britpart.
Assembly was pretty straight forward, I lubricated the bush and bearing with oil, then set the bearing pre-load (drag) as per the green book of words (3.6 to 4.5 kg) Fitted everything up with new seals and gaskets. Hopefully it'll stay leak free for a while. Half-shafts UJ's felt good so I've left them be, I replaced the distance piece, bearing race etc though. The tapered spacer that goes on after the race came out of the packet undersized, luckily I have access to a lathe so was able to bore them out by 0.1mm. This gave a total interference of 0.01mm, so after heating it with the induction heater it dropped straight on.
My latest order from LRdirect.com arrived a few days ago, which consisted of all the bushes, shackles, shackle pins, etc to fit the axles to the chassis. As well as two shiny Genuine Land Rover brake pipe plates (only because no one else makes them!) Britpart gets a bad rep but most of what I've bought so far has been reasonable, and if I bought everything genuine this project wouldnt be happening. I can't recommend LRdirect enough. Delivered to my door from the UK within 5 days, unreal service.
Lastly, I've fitted my spring and chassis bushes (using the tool I made to remove them initially) and I've hung the rear axle under the chassis, it all went fairly smoothly as all the parts were new. I coated the bolts in Kluber assembly paste so all going well I won't need the angle grinder next time I need to remove the springs. All the shackle pins have been left loose, I'll tighten them when the full weight of the Land Rover is on the springs.
Sorry for the long post, That's what happens when I get behind in posting!
Follow my progress as I rebuild a 1973 Land-Rover Series III. It needs a lot of work, with all the major assemblies needing an overhaul, and a complete bulkhead swap. My aim is to keep it as original as possible and keep costs down by doing most of the work myself. Feel free to comment with any feedback or suggestions!
Wednesday, 12 July 2017
Saturday, 17 June 2017
Chassis work begins
Since my last post I've been working mainly on my chassis. I got it back from sand blasting and promptly gave all the 'good' parts a coat of epoxy metal paint. It claims to be able to be applied straight to clean metal. I figure sandblasted is pretty clean so I went with it and it's come up well. I used Dulux Metal Guard, Satin Black. I'll give the whole thing another coat once all welding work is finished.
The paint looks quite glossy while it's wet but it dries flat.
First repair job was the front of the chassis rail, I cut the square cap from the front of the rail, removed the dirt and debris, wire brushed the inside and splashed some rust converter around inside. Followed by welding a new square piece of steel on the front.
Bulkhead outriggers were next, passenger side was repairable so I chopped out the swiss cheese sections and the angle brace. Cut new steel, welded in, then linished back to smooth. I used a piece of 30x30 angle iron to replace the brace. The original was a piece of folded steel, so I smoothed the sharp angle off the new piece for the original look.
Drivers side outrigger was beyond help, so I took some reference measurements and cut it off. You can buy replacements but as it's a pretty basic piece of fabrication I made my own. I cut the square blocks off the original and welded them to the new one, so it looks authentic.
I have only tacked it to the chassis, I'll fully weld it once the bulkhead has been fitted, just incase there are alignment issues. Although given the variations from side to side on the chassis, I guess you could drive a truck through Land Rover's tolerances, so it should be fine.
Next was the rear cross member, the most common area of a Land Rover chassis for rust to inhabit. I considered patching it, but it looks way too rusty on the inside, and it's made of all sorts of intricate folds so would be hard to replicate the parts. So I wanted to remove the cross member without disturbing the chassis rail ends (which also need repairing) so that I can measure their original length to re-create them. Before cutting, I made a jig so that a new cross member can be fitted in the exact same place.
Took a lot of perseverance with the angle grinder, but I got it off without cutting through the chassis rails, well what was left of them. I then made a cardboard template to give the shape and length of the ends of the rails. Then they were cut back flush with the spring hangers. The reason I'm doing this, is so that I can use a new crossmember without the extension rails, as the type with extension rails make the repair really obvious as it slips over the existing chassis. This way my repair can be more or less hidden.
Chassis work is on hold now until I can get my hands on a new crossmember. Still unsure whether I will buy one locally or from the UK. Still need to figure out what is cheaper.
While all this chassis work has been going on, my order from LRdirect.com arrived with all the parts to start assembling the rear axle.
Diff centre fitted with new gasket. Pinion seal and mud slinger also replaced. I need to wait until the axle is back under the chassis with some weight on the wheels, so I can torque up the pinion nut.
Then assembled and fitted the hubs and brake backing plates. I haven't set the hub end float, as they may need to come back off to fit the brakes, but it's good to have it all together loosely, just so the parts are all accounted for.
The paint looks quite glossy while it's wet but it dries flat.
First repair job was the front of the chassis rail, I cut the square cap from the front of the rail, removed the dirt and debris, wire brushed the inside and splashed some rust converter around inside. Followed by welding a new square piece of steel on the front.
Bulkhead outriggers were next, passenger side was repairable so I chopped out the swiss cheese sections and the angle brace. Cut new steel, welded in, then linished back to smooth. I used a piece of 30x30 angle iron to replace the brace. The original was a piece of folded steel, so I smoothed the sharp angle off the new piece for the original look.
Drivers side outrigger was beyond help, so I took some reference measurements and cut it off. You can buy replacements but as it's a pretty basic piece of fabrication I made my own. I cut the square blocks off the original and welded them to the new one, so it looks authentic.
I have only tacked it to the chassis, I'll fully weld it once the bulkhead has been fitted, just incase there are alignment issues. Although given the variations from side to side on the chassis, I guess you could drive a truck through Land Rover's tolerances, so it should be fine.
Next was the rear cross member, the most common area of a Land Rover chassis for rust to inhabit. I considered patching it, but it looks way too rusty on the inside, and it's made of all sorts of intricate folds so would be hard to replicate the parts. So I wanted to remove the cross member without disturbing the chassis rail ends (which also need repairing) so that I can measure their original length to re-create them. Before cutting, I made a jig so that a new cross member can be fitted in the exact same place.
Took a lot of perseverance with the angle grinder, but I got it off without cutting through the chassis rails, well what was left of them. I then made a cardboard template to give the shape and length of the ends of the rails. Then they were cut back flush with the spring hangers. The reason I'm doing this, is so that I can use a new crossmember without the extension rails, as the type with extension rails make the repair really obvious as it slips over the existing chassis. This way my repair can be more or less hidden.
Chassis work is on hold now until I can get my hands on a new crossmember. Still unsure whether I will buy one locally or from the UK. Still need to figure out what is cheaper.
While all this chassis work has been going on, my order from LRdirect.com arrived with all the parts to start assembling the rear axle.
'Distance Pieces' shrunk onto the stub axles using an induction heater.
Diff centre fitted with new gasket. Pinion seal and mud slinger also replaced. I need to wait until the axle is back under the chassis with some weight on the wheels, so I can torque up the pinion nut.
Then assembled and fitted the hubs and brake backing plates. I haven't set the hub end float, as they may need to come back off to fit the brakes, but it's good to have it all together loosely, just so the parts are all accounted for.
Wednesday, 7 June 2017
Leaf spring refurbishment
Spent Queens Birthday long weekend working on making the leaf springs presentable. They were in pretty bad shape, a lot of rust and pitting but they still have a reasonable curve in them so I'll take a punt on re using them. If I had the money I would buy new springs but if I was replacing everything this project wouldn't be happening.
So first I stripped the spring packs apart. The leaves were so rusted together that I had to use a hammer & chisel to separate them. Next was the challenge of removing the spring bushes. I made a puller with some M12 threaded rod, some tube and a boss I turned down to a diameter slightly less than the bush.
Once apart, I buzzed off as much of the rust as I could with a wire brush on the grinder.
I then applied CRC rust converter to help with the remaining surface rust.
A smear of assembly paste between the leaves
And reassembled and painted.
Another spring related job that needed doing was the spring plate/shock absorber mounts. The original pins were really worn and beyond repair, due to the shock absorber bushes collapsing. I dissected them and cut the pins from the plates. Cut some new shafts from 3/4" stock and welded them back onto the plates. Should be good for another 40 years
I'm expecting a package from www.lrdirect.com any day now, which has all the seals and gaskets etc for me to reassemble to rear axle, so expect a post about that soon.
In other news, I've put the engine on an engine stand so that I can move it around.
And the chassis is off to the sandblaster tomorrow
Stay tuned..
So first I stripped the spring packs apart. The leaves were so rusted together that I had to use a hammer & chisel to separate them. Next was the challenge of removing the spring bushes. I made a puller with some M12 threaded rod, some tube and a boss I turned down to a diameter slightly less than the bush.
Once apart, I buzzed off as much of the rust as I could with a wire brush on the grinder.
I then applied CRC rust converter to help with the remaining surface rust.
A smear of assembly paste between the leaves
And reassembled and painted.
Another spring related job that needed doing was the spring plate/shock absorber mounts. The original pins were really worn and beyond repair, due to the shock absorber bushes collapsing. I dissected them and cut the pins from the plates. Cut some new shafts from 3/4" stock and welded them back onto the plates. Should be good for another 40 years
I'm expecting a package from www.lrdirect.com any day now, which has all the seals and gaskets etc for me to reassemble to rear axle, so expect a post about that soon.
In other news, I've put the engine on an engine stand so that I can move it around.
And the chassis is off to the sandblaster tomorrow
Stay tuned..
Subscribe to:
Posts (Atom)
Long overdue update
It's been over a year since I posted here so I thought i should bring the blog up to date, incase anyone out there actually reads it! ...
-
Spent Queens Birthday long weekend working on making the leaf springs presentable. They were in pretty bad shape, a lot of rust and pitting ...
-
My apologies for not getting this post done earlier, I actually finished the gearbox about a month ago but havent found time to work on the ...